Counted cross stitch and simple patterns can look flat when colors are next to each other. Adding a thin, consistent outline changes that. This can be done by hand or with decorative stitches from a sewing machine.
This outline increases contrast, sharpens shapes, and gives your work a finished look. This article will show you practical tips for counted cross stitch and cross stitch for beginners. You’ll learn when to use a tonal outline versus a contrasting thread.
Decorative machine stitches like satin or small zigzag can add texture. Testing on fabric scraps is crucial. Bring a reliable machine, basic DMC floss, and a water-soluble stabilizer when you experiment.
Expect clear, usable guidance that keeps your tension steady. It will help you avoid over-outlining and ensure small motifs are clear. Whether you use classic patterns or design your own, this trick makes every motif look professional and intentional.
Key Takeaways
- Outlining or backstitching boosts contrast and makes motifs pop.
- Use decorative machine stitches sparingly to add texture and finish.
- Test on fabric scraps and record settings for reliable results.
- Choose tonal versus contrasting thread based on desired emphasis.
- Proper tension and thread choice prevent distortion and holes.
Why this stitching trick matters for your needlework and embroidery hacks
Small finishing choices greatly affect how a piece looks from afar. A neat outline or decorative edge adds structure and guides the eye. It makes motifs look intentional. Use simple cross stitch techniques or machine decorative stitches for this effect.
Decorative stitches add texture and visual separation. Use them on hems, seams, or blank areas to create contrast. A satin foot and stabilizer help keep edges crisp for machine accents. For handwork, choose backstitching techniques that fit the motif and fabric.
Test stitch settings on scraps before committing. Adjust stitch width, length, and tension for clear stitching at normal viewing distance. Document settings that prevent tunneling and grinning for future projects.
For counted work, a fine backstitch outline around motifs increases contrast and depth. It separates color blocks, sharpens borders, and makes each element stand out. This is especially useful when colors are close in value or patterns are busy.
The human brain reads crisp outlines as finished work. A neat backstitch or decorative border signals completion and craftsmanship. This visual cue raises the perceived quality of a sampler, pillow, or framed piece without changing the core design.
Below is a quick reference to compare common approaches. Use it to decide which stitch or machine setting to test first for your next project.
| Approach | Best use | Tools/settings | Visual effect |
|---|---|---|---|
| Fine backstitch | Counting cross stitch motifs, small details | 3-strand DMC, size 24 tapestry needle, short thread | Clean outline, higher contrast, crisp edges |
| Satin machine stitch | Fabric panels, hems, appliqué edges | Satin foot, stabilizer, narrow stitch width | Smooth, bold edge, professional finish |
| Open decorative stitch | Background texture or framing | Medium tension, test on offcut, decorative presser foot | Subtle texture, visual separation without heavy contrast |
| Split stitch or stem stitch | Curved outlines, floral stems | Two strands, embroidery needle, short stitches | Soft, textured line that reads as hand-crafted |
CROSS STITCH: the trick that elevates counted cross stitch patterns
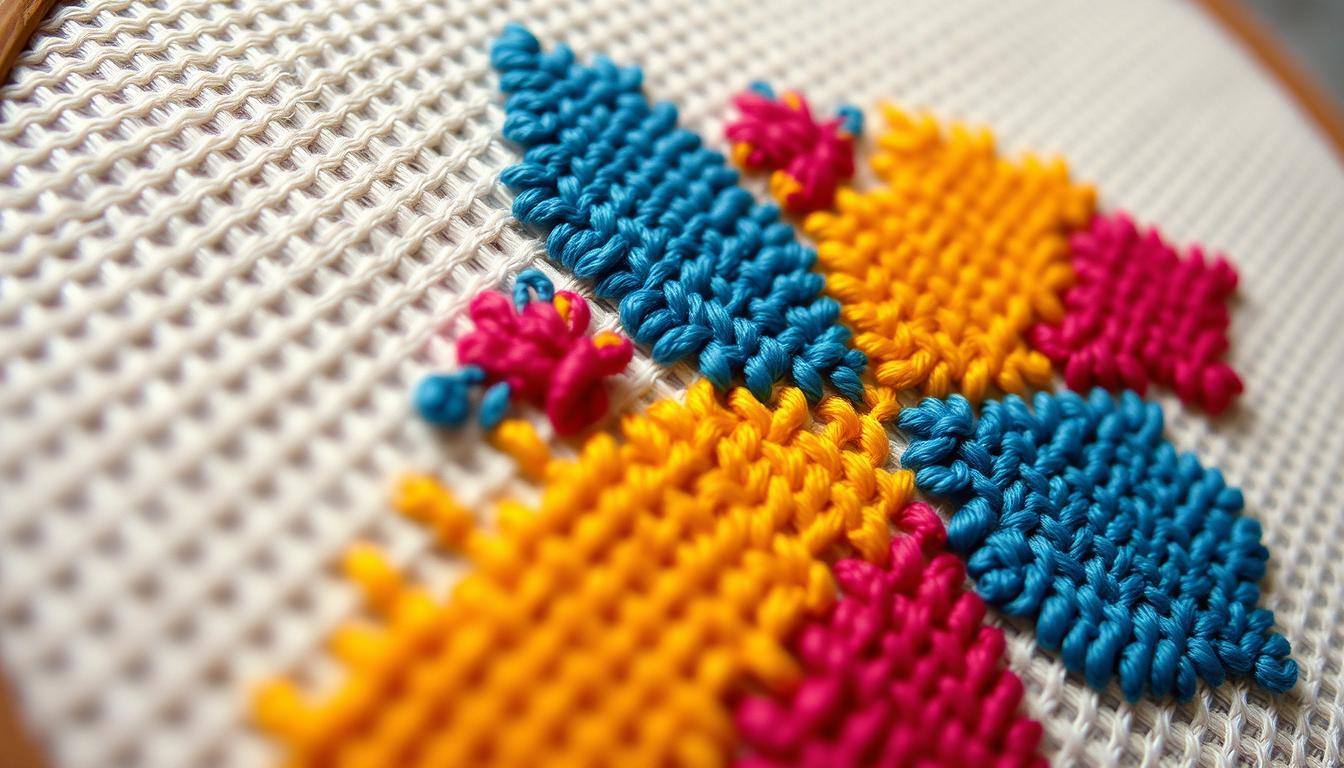
Adding a special outlining step can make any counted cross stitch look cleaner. This step uses hand stitches like backstitch, split stitch, or stem stitch. It helps define shapes, separate colors, and enhance small details.
What the trick is and how it applies to your projects
Start by stitching the main cross stitch blocks. Once the colors and fills are set, use a single or two strands of DMC to outline. For bold motifs, a darker outline adds clarity without overpowering. For tiny icons, contrasting thread makes them stand out.
Examples where outlining transforms color blocks
Outline flower petals with a deeper backstitch to make them pop. Use split stitch for small animal faces to suggest whiskers and expression. Stem stitch is great for curved features, keeping lines smooth on square fabric.
How the trick works on different fabric counts
On lower-count Aida (11–14 count), use thicker backstitch and wider thread for clear outlines. For higher-count or evenweave (16–28 count), switch to finer stitches. Always test on fabric scraps to adjust thread and stitch size.
Hand outlining can be paired with machine stitches for finished edges. Use a scrap backing or stabilizer to protect the embroidery when adding machine stitches.
Try different backstitch styles on the same fabric count to find the best contrast. Record your findings to improve your technique for both beginners and advanced stitchers.
Step-by-step how-to guide for adding the trick to beginner cross stitch projects

First, get the right supplies to keep your work neat. Use DMC floss for colors that last. Choose tapestry needles for most projects. A hoop or Q-snap frame helps keep fabric tight.
Don’t forget small scissors, a water-soluble pen, and your favorite tools.
Grid your fabric before stitching to match pattern squares. Mark every tenth square with a basting thread or a light wash-away pen. This makes stitching larger designs easier and less prone to mistakes.
Choose fabric count based on the pattern and your skill level. For beginners, 11–14 count Aida is best. It makes stitches clear and fast. Move to higher counts for finer details.
If you plan to add lots of embellishments, use a water-soluble stabilizer or a backing for support.
Cut DMC floss to 18–24 inches to avoid fraying and tangling. Test outlining with one to three strands on a swatch to see how bold the line looks against your stitches.
Start stitching without knots using the loop-start or waste-thread methods. Pull the thread evenly to keep backstitches flat and prevent warping. Work in short sessions to keep tension even.
Before adding machine decorative stitches, test settings on scrap fabric. Use an open-toe presser foot and a fully wound bobbin. Let the machine feed the fabric instead of guiding it by hand. Switch to a satin foot for dense decorative fills.
Check your needle choice before starting machine work. Avoid universal needles on delicate fabrics. For hand outlining, use milliners or crewel needles for split stitch on fine counts. Stick with blunt tapestry needles for cross stitch to protect threads and fabric.
Keep a small swatch log with your thread strand counts, needle sizes, and tension notes. For each project, note which tools and DMC floss shades worked best. This reference will speed up future projects.
Backstitching techniques and variations to make every design pop
Begin by trying three basic outlines to see how they look up close. The simple backstitch is great for text and small details because it’s sharp and clear. The split stitch is softer and works well on curves.
The stem stitch is perfect for botanical designs and flowing lines because it looks like a rope. On 14-count Aida, use two strands of DMC for the best outline. For finer fabrics, use one strand and a smaller needle to avoid overwhelming the design.
Always stitch a small test piece first to see how the thread and needle work together. This ensures the best look for your cross stitch.
Choosing the right colors is key. Use dark outlines on light fills to make things pop. For a more subtle look, pick threads that are one or two shades off from the fill. Don’t outline every part; save strong contrast for important motifs and backgrounds.
Adding hand work and machine stitches can make your design richer. Use machine stitches for borders, labels, or edges after you’ve stitched the fabric. Test different stitch lengths, needles, and tensions to avoid puckering.
When mixing hand and machine stitches, vary the thread weight and stagger rows for depth. This adds dimension to your work.
Don’t just stick to outlines. Add embroidery accents like French knots, seed stitches, and satin bars to highlight areas. A few accents can make a big difference, turning a flat piece into a lively design. Try small clusters of metallic or stranded threads to add sparkle without overwhelming the design.
Keep track of what works by logging stitch type, thread, needle, and machine settings. This helps you get consistent results and inspires new ideas for your projects.
Common cross stitch mistakes to avoid when using this trick
Before starting, test the outline on a scrap piece. Many mistakes come from using bold outlines on everything. This makes the design cluttered and takes away from the main motifs.
Over-outlining can mess up a design. Only use strong contrast on key elements. For secondary shapes, use tonal outlines or skip them. Test different thread weights on a small piece to see how it changes the look.
Tension errors can ruin your work quickly. A tight backstitch can pucker the fabric and mess up the grid. When using machine stitches, wrong tension or missing stabilizer can cause problems. Adjust the tension little by little and use a stabilizer on thin linens to avoid warping.
Choosing the wrong needle can cause issues. A big universal needle on fine fabric can leave holes. Use a tapestry or blunt needle that matches the fabric count. For sewing on stretchy fabrics, use ballpoint or stretch needles. These choices help avoid holes, skipped stitches, and thread damage.
Thread choice is as important as needle selection. Too many strands of DMC can make backstitch lines thick and holes obvious. Too few strands make outlines too faint. Keep track of the right thread counts for different fabric types. This log is a valuable cross stitch tip.
Start by testing and fixing problems. If stitches come loose when pulled, shorten the stitch length or use a stronger stitch. If seams are uneven or ladder, slow down, reduce presser foot tension, or use a walking foot. Note what works so you can do it again later.
Follow these steps to avoid common mistakes and reduce stress. Clear swatches, the right needle and thread, and careful tension checks can make your outline look professional and clean.
Advanced cross stitch techniques and embroidery inspiration using the trick
Take your stitching to the next level by adding texture to your designs. Start with a clean backstitch outline. Then, add French knots, satin stitch, or a narrow chain stitch for depth. This makes your designs feel more real and gives you new ideas for projects.

Combine handwork with machine stitches for faster borders. Use a water-soluble stabilizer over hand embroidery when adding machine stitches. This keeps your delicate cotton safe and your satin stitches flat.
Make a stitch catalog to use over and over. Sew swatches with stitch name, thread, needle size, and tension. Note which stitches work well together and which are perfect for small details.
Test special threads before adding them to your work. Metallic threads add sparkle but can fray. Use the right needles and slow speeds for these threads. A small test swatch saves time and keeps your main piece perfect.
Document your stitch trials to master techniques. Record needle, thread, stitch sequence, and tension for the best results. Keep these notes with your swatch catalog for future projects.
Experiment with new stitch combinations for unique motifs. Mix split stitch stems with seed stitches for fillers or satin bands inside backstitch frames. These combinations add to your stitch vocabulary and open up design possibilities.
Plan complex pieces by practicing on fabric scraps. Use a water-soluble stabilizer for machine overlays. This prevents puckering and keeps your fabric smooth under metallic threads. Small steps lead to beautiful finished work every time.
Organizing your cross stitch projects and tools for consistent results
Keeping your projects organized helps them move forward smoothly. Begin with a simple plan for each piece. This includes a labeled swatch, a stitch sample, and a short log of what worked.
This method turns one-off experiments into repeatable results. It also speeds up future projects.
Project planning: swatching, labeling, and a simple stitch sample library
Make a swatch for every thread and fabric combo you use. Label each swatch with thread brand, strand count, and fabric count. Add a tiny backstitch sample and a note about tension.
This way, you can reproduce the exact outline effect later.
Build a compact stitch sample library you can flip through. Include machine decorative stitch settings alongside hand-stitch notes. This helps you match a look to a fabric without guessing.
Storage and organization for DMC floss, needles, hoops, and cross stitch frames
Store DMC floss by number on bobbins or cards and keep an index for quick lookup. Use clear boxes or labeled drawers so colors stay visible and untangled. Proper DMC floss storage prevents fading and makes thread selection faster.
Keep needles in labeled cases for tapestry, crewel, and metallic types. Stash spare needles, a seam ripper, and a water-soluble pen in each project pouch. Hang hoops and cross stitch frames where they stay clean and ready.
Group project kits in zip pouches so patterns, fabric, and threads travel together.
Notes and testing log: recording stitch length, tension, and needle choices
Track stitch type, thread brand and strand count, needle size, fabric count, and tension settings in a simple log. Note machine stitch length and width when you use decorative stitches. Test on fabric offcuts and update the log after every adjustment.
When you write down what worked, you avoid repeating trial-and-error. Use gridding and pattern labeling to cut counting mistakes and keep outlines placed correctly. Small notes save hours and improve consistency across projects.
Cross stitch therapy and creative ideas to try with this trick
Stitching can calm your mind and sharpen your focus. Use small experiments to build confidence and enjoy cross stitch therapy while you learn the outlining trick.
Try quick projects that let you test outline styles without long commitment. Small samplers and bookmarks give fast feedback on thread choice and tension. Tiny hoop art fits on a shelf and makes perfect practice pieces.
Work through a short series of exercises. Start with one sampler, then move to a bookmark, then a tiny hoop. Note how contrasting versus tonal outlines change the look. These low-stakes sessions help you refine cross stitch ideas and technique.
For longer projects, plan how outlining will define major shapes. Quilts gain clearer blocks when motifs receive a careful backstitch border. Pillows look tailored when focal motifs are crisply outlined before finishing. Framed pieces hold the eye when outlines separate background and subject.
Combine hand outlining with machine decorative stitches on quilt borders. Use a stabilizer and the correct presser foot to avoid puckering. These steps protect fabric and preserve the clean lines that make larger works read as finished art.
Use this trick as a mindful routine. The steady rhythm of counted stitches and the precise motion of outlining reduce stress and promote concentration. Treat practice sessions as experiments, log results, and build a simple sample library to track what works best.
| Project Type | Practice Goal | Suggested Outline | Time |
|---|---|---|---|
| Sampler | Test contrast and stitch type | Short backstitch in tonal thread | 1–2 hours |
| Bookmark | Edge control and tension | Contrasting backstitch on edges | 30–60 minutes |
| Small hoop art | Composition and focal clarity | Bold outline around motif | 1–3 hours |
| Quilt block | Define blocks and add depth | Tonal outlining plus machine border | 3–8 hours |
| Pillow panel | Finish details for home decor | Delicate backstitch around subject | 2–6 hours |
Keep notes on needle size, floss brand like DMC, and stitch length. That log will make your cross stitch projects repeatable and more relaxing. Small, regular practice sessions make the outlining trick feel natural and rewarding.
Conclusion
Adding a simple outlining or backstitch trick to your CROSS STITCH pieces can make a big difference. It sharpens contrast and gives motifs a polished look. Using backstitching techniques with machine decorative stitches can add texture and shine. But first, test tension and stabilizer choices on a fabric offcut.
For the best results, use quality supplies like DMC floss and the right needle size. A stable hoop is also key. Keep a swatch library and a testing log to make your cross stitch techniques and embroidery hacks repeatable. These small records save time and help you refine thread choices, stitch length, and machine settings.
Beginners should start small by making a sampler. Practice backstitch variations and note which combinations work best. Focus on clean tension, knot-free starts, and gradual adjustments to machine tension. Use an open-toe presser foot and the correct stabilizer when adding decorative machine stitches. Also, fill bobbins fully for long runs.