You’re about to learn the clear differences between counted cross stitch and broader embroidery. This short guide shows how each method looks, what tools you need, and how to choose the best craft for your next project.
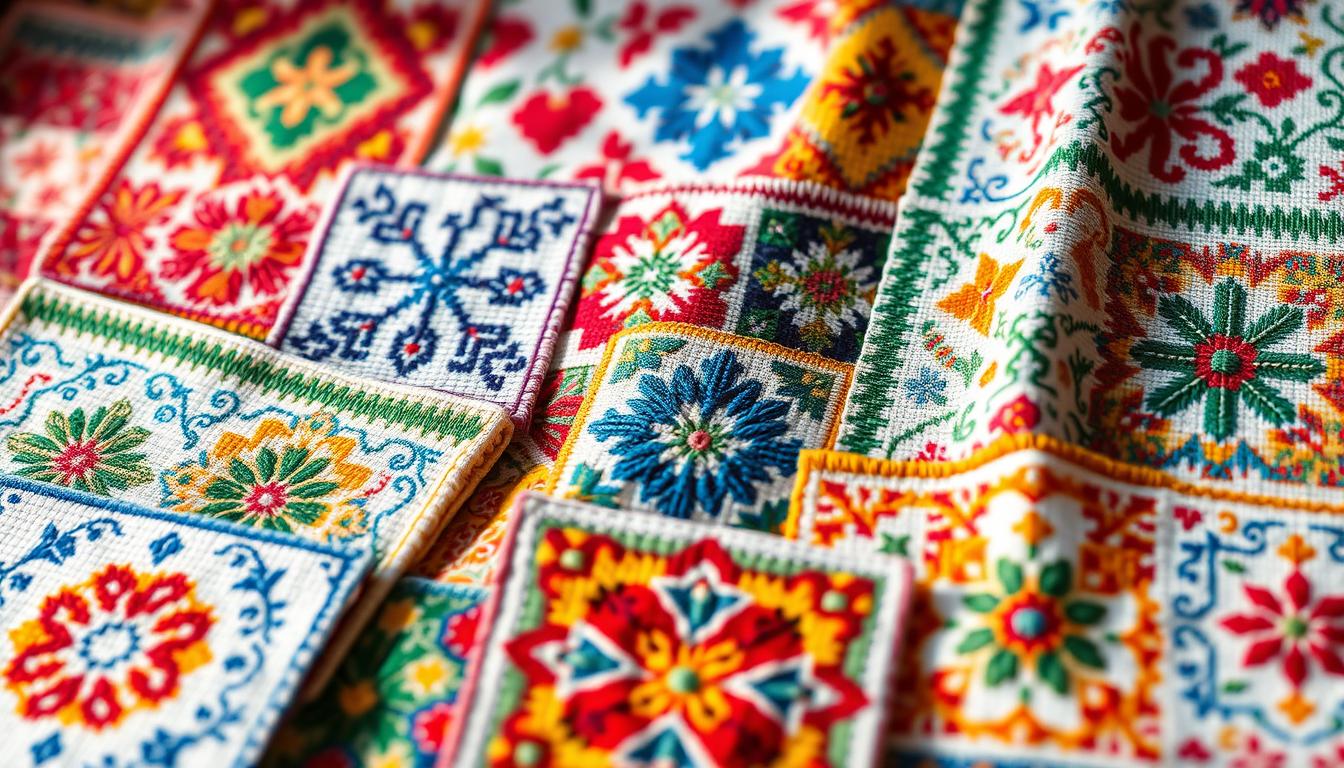
Cross stitch uses a simple X-shaped stitch on aida fabric with evenly spaced holes, making crisp, pixel-like designs. Beginners often start with 14-count aida and six-strand embroidery floss for easy, neat work.
Embroidery lets you vary outlines, texture, and shading with many stitch types. That freedom suits painterly designs and freeform motifs that don’t rely on a grid.
You’ll also get tips on what to add to your cart, how to shop for kits, and which patterns match your skill and time. By the end, you’ll feel ready to pick a kit, start stitching, and spot the right designs for your space.
Key Takeaways
- Counted cross stitch gives grid-based, pixel-like results ideal for photo-style patterns.
- Embroidery offers more texture and freeform techniques for varied finishes.
- Start with 14-count aida and a basic kit if you’re a beginner.
- Check patterns and kit contents before you shop to avoid surprises.
- Choose based on your skill, time, and the final look you want.
How to tell cross stitch from embroidery at a glance
You can identify the technique almost instantly by checking the fabric’s weave and the stitch shapes. A few visual checks give you the answer fast.

Fabric and surface
Aida fabric has a clear, even grid of holes. That grid produces tidy, pixel-like Xs and helps you count stitches per inch.
Free-weave cloth like linen or cotton lacks that visible grid. You’ll see flowing outlines and varied fills on those surfaces.
Threads and needles
Traditional counted work uses six-strand floss and an elongated, blunt needle that slides through aida holes. By contrast, hand embroidery uses sharp needles that pierce fabric and many thread types for texture.
Stitch structure and tools
Look for uniform X-shaped marks aligned to a grid to spot counted pieces. If you see satin fills, backstitch outlines, or knots, you’re likely looking at surface embroidery.
- Patterns: counted charts vs transferred outlines
- Hoops: both use them, but tension and technique differ
- Touch: grid-like rise vs mixed textures
CROSS STITCH essentials: materials, method, and when you should choose it
Counted work relies on an even grid and predictable repeats, which makes planning simple. The aida “count” tells you how many little squares appear per inch; a higher count means smaller Xs and finer detail.
The aida count explained and why 14-count is beginner-friendly
Start with 14-count aida. The holes are easy to see and count, so you place each stitch accurately without eye strain. That count balances speed and detail for first projects.
Your toolkit: floss, hoop, blunt needle, scissors, and pattern basics
Your core kit should include six-strand floss, a blunt eye needle, a hoop, and sharp scissors. Use a soluble marker or magic paper to mark placement on the fabric.
Perfect uses: counted patterns, kits, quick gifts, and photo-style designs
“Complete kits are ideal when you want everything in one box — fabric, pre-sorted floss, needle, and chart.”
- Rely on cross stitch kits or stitch kits for easy starts.
- Browse free patterns before you add premium supplies to your cart.
- Keep a small travel project pre-hooped for quick stitching sessions.
| Item | Why it matters | Beginner tip |
|---|---|---|
| 14-count aida | Easy to see and count | Reduces eye strain |
| Floss & thread | Controls coverage and color | Separate strands to match fabric |
| Needle, hoops, scissors | Tension and precision | Use blunt needles for counted work |
Embroidery basics: how it differs and when it’s the better fit
When a design needs organic curves and texture, embroidery gives you the tools to draw with thread. You’ll choose this approach for flowing outlines, lettering, and richly textured fills that go beyond the uniform X of counted work.

Common stitches beyond the X: backstitch, outlines, and embellishment
Backstitch is your go-to for crisp outlines and lettering. Tutorials often show step-by-step backstitch for clean lines that define a design.
Layer in satin stitch, French knots, long-and-short shading, and couching to add sheen and dimension. You’ll work mostly on free-weave fabric with a sharp needle so each stitch lands exactly where the pattern needs it.
- Reach for embroidery when you want expressive lines, shading, or bead embellishments.
- Consider stitch kits that teach technique variety with guided diagrams.
- Use stabilizers and an embroidery hoop for delicate fabric and steady tension.
“You can blend disciplines: many cross stitch pieces benefit from backstitch to sharpen edges.”
Shop kits, patterns, and supplies to start your next stitching project
A smart shop list keeps your next craft session smooth and satisfying. Pick tools and patterns that match your skill and the time you have available.
All-in-one kits save time. Choose cross stitch kits or stitch kits that include fabric cuts, floss, charts, and needles so you don’t hunt for extras. They’re great for gifts and quick wins.
Downloadable patterns and seasonal designs
Want instant access? Add downloadable patterns to your cart for same-day starts. Many shops offer seasonal collections—holiday gnomes, Santas, and winter motifs—to match your decor and gifting calendar.
Supplies to add to your cart
- Floss & thread—stock staples so color runs don’t slow you down.
- Hoops & frames—steady tension matters for a clean finish.
- Organizers, finishing notions, and extra needles—small items that prevent stalls.
Gifts, deals, and shopping tips
Check the sale section for pattern and kit discounts, including Quick & Easy Pattern sales for fast finishes. Use gift cards when you want to give choice without guessing size or theme.
“Combine a free downloadable library with a premium kit to practice before committing to a large design.”
Pro tip: build a season-ready queue in your cart—one travel pattern, one month-long kit, and one statement design—to keep projects flowing and take advantage of free-shipping thresholds and customer support when needed.
Conclusion
Knowing your tools and fabrics helps you choose confidently. Pick a grid approach for pixel-like detail or a freeform method when you want flowing lines and texture.
Start small: grab a beginner kit, 14-count aida, and the right thread to practice counting and tension. Use tutorials to learn basic stitch moves and reading charts.
Compare kits and assemble a small stash of threads so you don’t stop mid-project. Then move up to medium pieces and a statement work when you feel ready.
Make a simple plan, pick one project, and start today—momentum makes progress more rewarding.