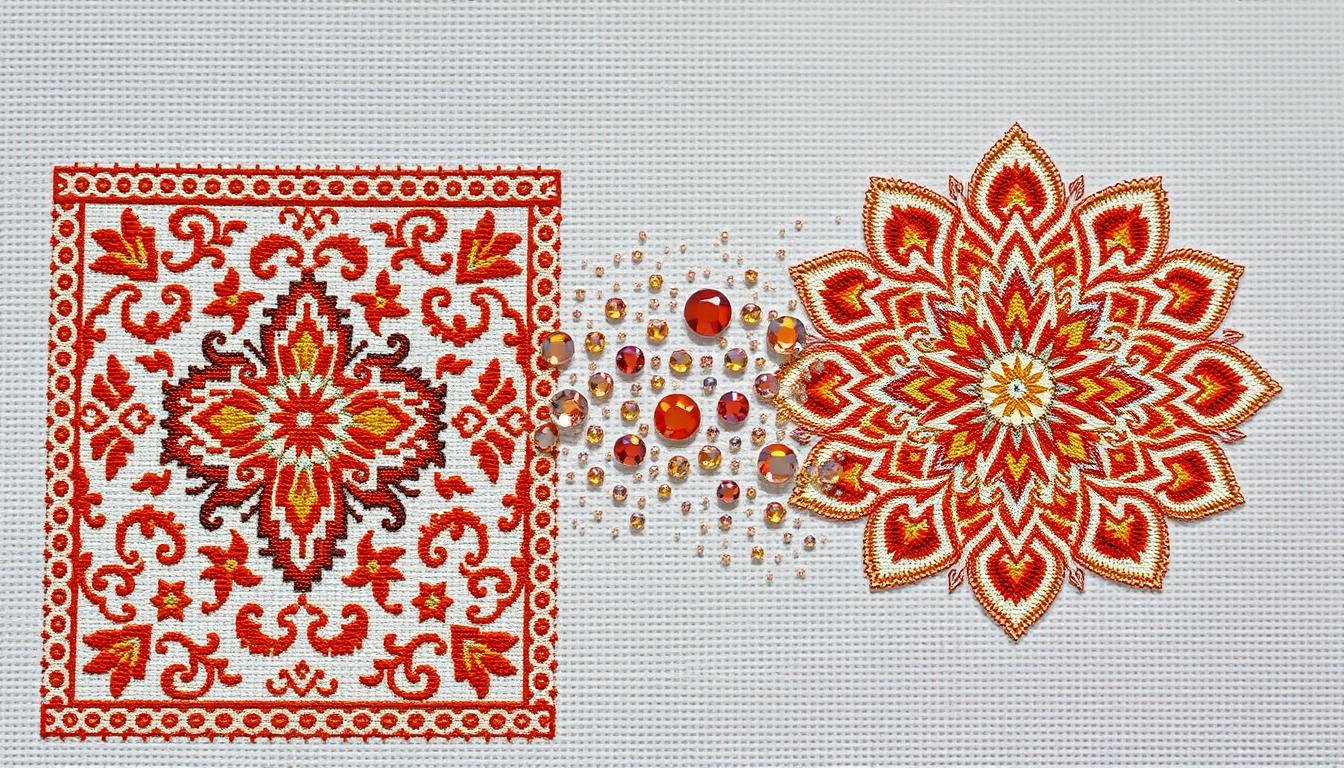
You found a simple way to turn your favorite cross stitch chart into a sparkling diamond painting plan. Our service mapped every symbol and coordinate to drills so you skipped the guesswork that used to slow your project.
The result kept the look and feel of traditional needlework while adding the shine of diamonds. We matched your source designs to an optimal canvas size and preserved the original grid so proportions stayed true.
You received a ready-to-use package that saved time and shopping. One order in your cart covered exact drill counts and material needs, so you didn’t hunt for odd accessories mid-project.
Because we refined this process on hundreds of requests, checks kept symbol legibility and alignment intact. That meant your finished piece looked like your source artwork, with the same spirit and structure you planned.
Key Takeaways
- You avoid conversion guesswork by getting drills mapped to each stitch symbol.
- Design proportions remain accurate after aligning charts to canvas size.
- One ready package reduces time spent shopping and preparing supplies.
- Proven checks preserved symbol clarity and cross alignment you knew from your kits.
- The finished project kept the spirit of your source designs while adding sparkle.
Turn your cross stitch charts into polished diamond painting patterns with our expert service
We converted printed charts into polished diamond diagrams that kept scale, clarity, and color fidelity intact. You got a clean preview, a simple legend, and a drill list so you spent less time prepping and more time creating.

Why crafters chose our conversion: clarity, color accuracy, and time saved
Clear symbols: our team reviewed legends so you didn’t strain to read a grid. That made translating each cross to a drill fast and confident.
Color mapping: we matched floss and thread to tested bead tolerances. You avoided overbuying supplies and knew how many drills to add to your cart.
Suitable for beginners and seasoned stitchers: from simple motifs to heirloom patterns
Beginners appreciated diagrams that explained 14-count aida, toolkits, and fabric basics in plain terms. Experienced makers liked precise scale controls for heirloom results.
- You could keep using favorite cross stitch kits or opt for custom charts.
- We pointed out which kits, stitch kits, or items in a shop went well with your design.
- Customers finished more pieces because prep time was removed, letting them enjoy stitching sooner.
CROSS STITCH to diamond painting: how our conversion process worked
Start by uploading your pattern file—we accepted PDF, high-resolution images, or compatible chart exports.
Upload your pattern: accepted chart formats and photo-to-pattern options
You uploaded a chart or a photo and our photo-to-pattern step created a gridded basis when needed. This ensured every symbol and coordinate was preserved for mapping to drills.

Grid, count, and scale: translating aida counts to drill size and canvas
We analyzed the chart grid to confirm true count, including common 14-count aida, which many beginners prefer. Then we translated that count to an equivalent drill size and canvas dimension so your stitch density became a predictable diamond layout.
Color mapping: from floss & thread palettes to bead/drill color sets
We imported your floss and thread palette, applied nearest-color matching, and used handcrafted overrides where needed. Each swap was documented in the legend to preserve tonal transitions and reduce surprises when you shopped for drills or used existing kits.
Proof & revisions and final delivery
You received a full-color proof with a legend and a per-color drill list. You marked refinements on the preview, and we adjusted outlines that benefited from backstitch-like borders.
“Our quality checks kept symbol spacing true so each cross aligned with a single drill.”
Final PDF delivery included a printable pattern, easy-to-read legend, and drill counts so you could place items in your cart with confidence. Notes also reminded you about needle and hoops habits, sharp scissors, and familiar floss references to keep your workflow smooth during the project.
| Step | What you provided | What we delivered |
|---|---|---|
| Upload | PDF / image / chart export or photo | Gridded basis ready for mapping |
| Count & scale | Fabric/count reference (e.g., 14-count) | Canvas size and drill size equivalent |
| Color mapping | Floss / thread palette | Drill color matches + documented substitutions |
What you provided so we could deliver a perfect pattern
After you uploaded files, your details directed every conversion choice. You told us if the artwork came from cross stitch kits, a downloadable pattern, or an original drawing. We confirmed image resolution and preserved symbol placement so each square mapped exactly to one drill.
Your chart or design: kits, downloadable patterns, or original artwork
You sent the chart and we checked format and clarity. That kept motif edges and lettering crisp in the diamond layout.
Fabric/count reference and finished size you wanted to achieve
You noted fabric count, such as 14-count aida, and the desired finished size. This let us set canvas tiles and drill density so the final piece matched your measurements.
Thread/floss info: brand, color numbers, and any backstitch or specialty notes
You provided floss brands and color numbers, flagged backstitch lines, and noted specialty threads. We translated outlines and texture cues into clear drill guidance and a concise legend.
“List your fabric count, floss numbers, and tools so conversions stay faithful to the original plan.”
| What you provided | Why it mattered | Our delivery |
|---|---|---|
| Chart source (kit, download, art) | Preserved symbol placement | Accurate drill mapping |
| Fabric count & finished size | Set correct canvas and density | Printable tiles sized to your preference |
| Floss/threads & backstitch notes | Kept color intent and outlines | Legend + drill color matches |
| Owned supplies (needle, hoops, extras) | Avoided duplicates in cart or shop | Trimmed supply list to essentials |
Quality standards, pricing, turnaround, and optional supplies
We delivered outputs designed to remove uncertainty and speed your project start. Our conversion files met professional print standards so every symbol and grid lined up for effortless work.
Professional-grade outputs: clear symbols, readable legends, and neat grids
Clear symbols: every mark printed sharply so you read the legend at arm’s length without squinting. That meant you spent time on placement rather than decoding a chart.
Color checks: we compared floss references to drill batches and flagged tones that shift under warm or cool light. Notes in the legend explained any adjustments.
Add-ons you could shop: drills, fabric alternatives, needles, hoops, and gift-ready kits
You could add drills, alternative fabric-backed canvases, a reliable needle, sturdy hoops, or companion kits to your cart. We pointed to proven retailers and noted when a weekend sale matched your needs.
“We annotated the pattern with practical tips such as working in 10×10 blocks and checking alignment every few rows.”
| Area | What we checked | What you got |
|---|---|---|
| Print clarity | Symbol legibility & grid alignment | Proofed PDFs ready for printing |
| Color fidelity | Floss to drill comparisons | Annotated legend + drill counts |
| Pricing & timing | Chart size, color count, revisions | Upfront quote, standard turnaround |
| Optional supplies | Recommended kits, needles, hoops | Shopping list and sale alerts |
If this was a gift, we bundled a simple checklist so assembling a present-ready parcel was easy. Your documentation also recorded pattern scale and drill totals for future reprints or enlargements.
Conclusion
Final proof-first delivery saved time, and your design moved from thread to drills with precise mapping so you spent more time creating.
You preserved every cross and key motif while we simplified prep. Clear, printable patterns cut formatting work and kept thread notes where they mattered.
You checked symbols once, placed only needed items in your cart, and — if you liked bundles — paired files with select kits or stitch kits without hunting for a specialty needle or odd accessories.
When you chose to shop extras, our notes guided smart buys and helped you catch a timely sale. The finished piece made a lovely gift or a keepsake that honored your original art and our professional conversion.