Can a standard Singer or Brother sewing machine really produce beautiful embroidery that looks like professional thread art?
This article shows you clear, practical steps to create sewing-machine embroidery at home. You’ll learn free-motion drawing, using decorative stitches, zig-zag and satin techniques, plus appliqué-style methods. Your projects will look handcrafted and polished.
You’re a home sewist in the United States who wants to expand into monogramming, upcycling, and creative needlework without buying an embroidery machine. The advice here covers supplies, fabric prep, machine settings, stitching strategies for letters and shapes, and finishing touches.
Tips are drawn from multiple how-to tutorials and blog posts. They show stitch-width adjustments, water-soluble stabilizer use, interfacing, and when to hoop or skip the hoop. Read on and you’ll be ready to turn your regular machine into a tool for attractive, original embroidery and thread art.
Key Takeaways
- You can achieve attractive embroidery-like results with a domestic sewing machine.
- Free-motion, decorative stitches, and satin techniques form the core methods.
- Proper stabilizers, needles, and hooping (or hoop-free methods) matter most.
- Simple machine settings and stitch-width adjustments improve outcomes.
- This guide prepares you to stitch letters, shapes, and appliqué-style details.
- After following the steps, you’ll confidently add creative needlework to garments and upcycles.
Why you can (and can’t) call it embroidery on a regular sewing machine
Embroidery is about decorating fabric with thread. This broad definition means many sewing machine projects can be called embroidery. You can use free-motion, decorative stitches, and textured fills to add a handmade touch.
Definition and limitations
But, there are limits when comparing embroidery on sewing machines. A regular sewing machine can’t handle digitized files or multi-needle sequences. Machines from Brother or Janome offer automated color changes and precise work that home machines can’t.
What a regular sewing machine can achieve
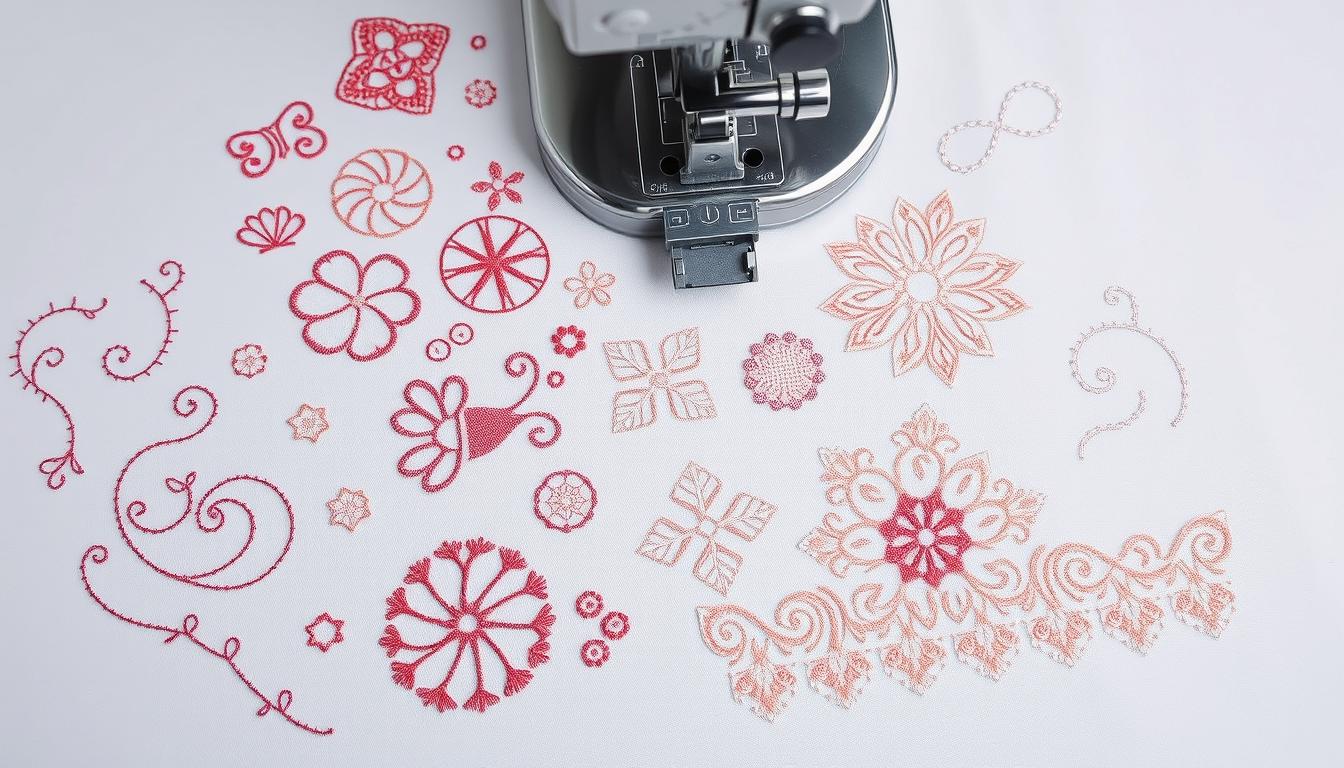
Your machine can do a lot, like outlining designs with zig-zag or satin stitches. It can also draw shapes and make monograms, floral motifs, and patches. Tutorials suggest using a small stitch length for satin work and practicing feed control for better results.
What requires a real embroidery machine
For big, multi-color designs based on digitized files, you need an embroidery machine. These machines offer consistent fills, exact registration, and speed for repeat runs. If you need precise replication across many items, a dedicated machine is best.
Practical craft differences
Choosing a sewing machine means embracing charm and slight imperfections. This handmade look is perfect for upcycled items and small batches. When deciding, consider convenience, cost, and the look you want for your project.
Supplies you’ll need for sewing-machine embroidery
Getting great results with a regular machine is possible with the right supplies. Here’s a list of what you need: hardware, threads, stabilizer options, needles, and small tools. These items can make a big difference in your stitching experience.

First, you’ll need the right feet and hardware for controlling the stitch path. A free-motion quilting foot, also known as a darning foot or hopping foot, lets you move freely. A clear-toe embroidery foot or monogramming foot helps you see lines better for satin stitch or decorative stitches. Any sewing machine that can do satin stitch or adjustable zig-zag is a good base for thread art.
Next, choose needles and threads that match your fabric and desired look. Use embroidery needles for specialty threads to reduce friction. If your thread keeps breaking, try a universal or heavier topstitch needle. Rayon and polyester threads add shine and glide well. But, regular polyester or cotton threads will give a different finish.
For stabilizing fabric and keeping stitches sharp, pick the right stabilizers. Water-soluble stabilizer is great for transferring designs and for delicate lines. Printable stabilizer sheets let you print or trace patterns directly. Tear-away or fabric backing is good for dense satin work. Iron-on interfacing, usually midweight, helps prevent puckering; cut it larger than your design to keep stitches inside.
Keep a small tool kit handy. Use a disappearing-ink fabric marker for tracing. Have sharp scissors for fabric and heavier scissors for stabilizer. An eight-inch embroidery hoop holds thin fabric tight for free-motion work. It can also sit flat on the machine arm when needed. For small pieces, iron-on self-adhesive stabilizer keeps the design in place while stitching.
Follow basic needle techniques to protect your thread and fabric. Slow down when starting curves or satin fills. Use shorter stitch lengths for dense fills and longer for outlines. Always test on scrap fabric with the same stabilizer, interfacing, and thread to avoid surprises.
Here’s a quick checklist for easy reference:
- Presser feet: free-motion (darning) foot and clear-toe monogramming foot
- Needles: embroidery needles, universal or topstitch backup
- Threads: rayon or polyester embroidery thread plus a spool of regular thread
- Stabilizer: water-soluble, tear-away, and iron-on interfacing
- Tools: disappearing-ink marker, two pairs of scissors, eight-inch hoop
Preparing your design and fabric for best results
Before you start sewing, plan your project. Choose a simple design that looks good as an outline. This makes it easier to pick and reduces mistakes. Sketch by hand or use Adobe InDesign or Microsoft Word to draft, then print clear outlines for tracing.
Choosing and transferring a design
Start with outlines and avoid dense fills. Use a printable stabilizer sheet or a water-soluble stabilizer to print or draw the pattern directly. Cut the stabilizer with a 0.5 inch margin to handle it easily without messing up the lines.
To transfer the design, use a light box or tape the paper to a bright window and trace with a disappearing-ink marker. For small pieces, stick a self-adhesive stabilizer to the fabric and stitch through it. This gives a clear guide and keeps the artwork aligned.
Stabilizing and interfacing strategies
For most fabrics, use a medium-weight iron-on interfacing. Fuse it larger than the embroidery area to prevent puckering and keep shapes crisp.
Thin or sheer fabrics need a close-fit interfacing cut to match the design shape. Use a water-soluble stabilizer to hold guide lines in place and rinse it away after stitching. For tiny upcycled scraps, self-adhesive stabilizer paper holds pieces steady while you sew.
Hooping techniques and when to skip the hoop
Use an embroidery hoop for free-motion work on light fabrics. Place the hoop upside down so it sits flat on your machine arm. This makes turning the piece easier as you stitch curves and corners.
If you use heavy interfacing that is fused to the fabric, you can skip the hoop. The interfacing can act like a stabilizer and supply enough tension for small elements. When a tiny piece must be hooped, baste it to a larger fabric that fits the hoop, remove the basting after stitching, and trim the backing to about 1/8 inch around the work.
| Step | Why it matters | Quick tip |
|---|---|---|
| Choosing design | Simple outlines reduce stitch density and make shapes clearer | Start with single-line motifs like leaves or simple letters |
| Transfer design | Accurate transfer keeps placement consistent and speeds stitching | Use printable stabilizer or a light box with a disappearing pen |
| Stabilizer | Prevents puckering and supports stitches on lightweight fabrics | Choose water-soluble for removable guides; use adhesive for small scraps |
| Interfacing strategies | Gives body and lets you skip hooping on heavy pieces | Fuse medium-weight interfacing larger than the design area |
| Hooping techniques | Keeps fabric flat for even stitching and easier maneuvering | Hoop upside down on the machine arm; baste small pieces to a larger base |
Free-motion embroidery and drawing with your sewing machine
Free-motion embroidery lets you add custom texture and hand-drawn designs to your sewing. Before you begin, set up your workspace. Test different threads and stabilizers. Also, plan out simple stitching guide lines to keep your work steady.

You’ll need to adjust your machine for free-motion embroidery. Lower the feed dog and attach a free-motion or darning foot. This lets you move the fabric freely. Use an embroidery needle and high-quality thread. If you see loops or skipped stitches, switch to a jean or topstitch needle.
Make sure the presser foot is visible to follow your guide lines. Raise the presser foot often to adjust your fabric. Use the handwheel for precise needle placement. These steps are key for drawing and monogramming.
Plan your letter and shape designs. Lightly mark guide lines on stabilizer or fabric. Stitch from left to right and bottom to top for straight lines. Use narrower stitch widths for edges and wider for fills. Test these widths on scrap fabric first.
For curved strokes, stop with the needle down, lift the presser foot, and pivot the fabric. Then, continue stitching. Increase stitch width by 0.5 mm for wider fills. A two-pass technique creates a denser, cleaner fill.
When monogramming, plan your start and stop points. Decide where to backstitch to avoid excess thread trimming. Use a hand-sewing needle to secure thread ends with a small double knot and trim to 0.5 inch.
To remove water-soluble stabilizer, peel off large pieces and soak or rinse the rest. Gently rub to remove residue, air dry, and press the piece. Be careful not to damage your stitches while cleaning and pressing.
Using decorative stitches and zig-zag/satin techniques
Choose the right stitch for the job and test on scrap fabric. Decorative stitches can give borders and motifs personality. A satin stitch or a narrow zig zag stitch creates dense, shiny outlines that read like embroidery when done carefully.
Start outlines with a straight stitch for clean edges, then layer with decorative stitches for texture. For fills, try square, buttonhole, or specialty decorative stitches to add weight without bulk. When you want a glossy, raised effect, use satin stitch in short passes and tune thread tension.
Layering stitches helps you build depth. Do an initial pass to mark shape, then retrace in reverse to close gaps. For monograms, stitch once for shape and run a second pass exactly over the first to even coverage. This two-pass approach gives a fuller look without an embroidery machine.
Simulate appliqué by sewing a tight zig zag stitch over marked shapes. Keep feed dogs engaged so fabric moves smoothly and you avoid puckering. If you use cut fabric pieces, stitch a dense edge to lock them down.
Work corners and curves with care. Slow the machine, leave the needle down, lift the presser foot, pivot, then continue. For sharp corners, a monogramming foot or clear toe foot makes it easier to follow guide lines. For curves, change stitch width in small increments while pivoting the fabric so the needle tracks the line.
Follow stitch width tips by testing increments on scraps before the final piece. Use the handwheel to check needle placement and ensure the needle hits your guide line. Small adjustments of about 0.5 mm can smooth a curve or sharpen an outline.
Use this quick reference to match stitch choices to tasks and to plan layering stitches and stitch width adjustments for best results.
| Task | Best Stitch | Technique |
|---|---|---|
| Clean outline | Straight stitch or wide straight | Slow stitching, needle down pivoting at corners |
| Shiny fill or border | Satin stitch or narrow zig zag stitch | Short stitch length, test width on scrap, two-pass for density |
| Textured fill | Square, buttonhole, specialty decorative stitches | Layer decorative stitches over base outline for depth |
| Appliqué look | Tight zig zag stitch | Keep feed dogs engaged, dense edge stitching, trim carefully |
| Sharp corners and curves | Adjustable zig zag or satin stitch | Needle down, lift presser foot, pivot, small stitch width changes (~0.5 mm) |
Appliqué-style and combined techniques for more complex designs
Think of layers and texture, not extra fabric. Use dense zig-zag or satin stitches to fill shapes on a regular sewing machine. Lower the stitch length and increase density for a solid patch look. Adjust stitch width for tapered points and smooth curves.
Make multicolor or textured fills by layering thread colors and changing stitch patterns. Start with a free-motion doodle outline, then add decorative stitches for texture. Finish with satin or dense zig-zag for a defined edge.
Combine free-motion, decorative stitches, and satin work in a two-pass workflow. First, do the loose free-motion drawing. Then, add decorative stitches for texture. Finish with satin or dense zig-zag for focal areas and borders.
For garment and upcycled embroidery, stabilize well. Use iron-on interfacing for small scraps and tricky panels. Baste small garment sections to a larger scrap to hoop safely, then remove basting and trim backing to about 1/8 inch after stitching.
Expect and accept small irregularities; they add character to custom pieces. Work slowly around seams, zippers, and bulky spots. With practice, you’ll see what a domestic machine can do with appliqué techniques and creative projects.
Comparisons and related stitching types: needlepoint vs embroidery and cross stitch
Before you choose a technique, understand how they differ. Needlepoint, cross stitch, and freehand embroidery have unique grounds and goals. This affects durability, detail, and the final look on items like apparel, pillows, or framed art.
Needlepoint involves working on canvas with specific stitches. It creates a dense, textured finish that’s great for heavy use. Needlepoint is perfect for structured panels or firm pillow faces.
Cross stitch uses X-shaped stitches on evenweave fabric. It’s like pixels on a chart, ideal for detailed images and precise repeats. Cross stitch is best for crisp, charted images or samplers.
Embroidery for sewing machines is more flexible. You can use various stitches to create organic shapes and monograms. It’s great for garments, upcycled pieces, and quick decoration.
When comparing needlepoint and embroidery, consider texture and placement. Needlepoint is best for heavy, structural items. Cross stitch is ideal for detailed pictorial work. Machine or free-motion embroidery is perfect for fast, flowing designs on clothing or mixed-media pieces.
Using techniques from different stitching types can enhance your work. Machine embroidery’s satin or zig-zag fills can mimic hand satin stitch’s glossy coverage. Free-motion cursive and looped stitches can add hand-like flourishes to machine work. Counted crafts’ planning habits can help with cleaner lettering and shapes.
Below is a compact comparison to help you choose the right approach.
| Craft | Ground | Look | Best for |
|---|---|---|---|
| Needlepoint | Canvas (counted) | Dense, textured surface | Pillows, panels, durable decor |
| Cross stitch | Evenweave/Aida (counted) | Pixelated, charted images | Pictorial samplers, motifs |
| Machine/free-motion embroidery | Regular fabric (non-counted) | Fluid, organic lines and fills | Garments, monograms, quick embellishments |
Match your material, time, and desired texture to the stitching types available. This helps you choose between needlepoint vs embroidery or decide when cross stitch will better serve the design.
Conclusion
You can get amazing embroidery-like results with a regular sewing machine. Just use free-motion drawing, decorative stitches, and satin and zig-zag fills. Also, try appliqué-style techniques.
Before starting, prepare well. Transfer your design, pick the right stabilizer or interfacing, and use the correct needles, thread, and presser feet. This will improve your thread art and make complex stitches easier.
Start with simple designs and practice pivoting and adjusting stitch width. Doing two-pass fills will help you get better. Use water-soluble stabilizer for guides and test on fabric scraps or upcycled clothes first.
For needlepoint and cross stitch, they can help plan your textile art’s texture and density. This will make your project even better.
If you need exactness, multi-color designs, or fast work, get a dedicated embroidery machine. But, if you want something handmade, budget-friendly, and fun, your sewing machine is perfect. It lets you create unique thread art and try new stitches with great results.