Ever wondered why some bead embroidery looks effortless, while yours seems stiff or lopsided?
Bead embroidery stitches beads onto fabric to create textured designs. The right foundation fabric is key. It prevents pilling, buckling, and fraying.
In this guide, you’ll learn insider tips. Start with focal beads, control tension, and match thread colors. These steps turn your beadwork into polished textile art.
By the end, you’ll see how bead embroidery enhances needlework and thread art. You’ll also learn to save money with basic tools and household liners. Plus, cutting foundation shapes before stitching makes finishing easier.
Key Takeaways
- Pick a strong foundation—GoodFelt, leather, denim, or stiffened felt prevents distortion.
- Use Ultrasuede or similar backing to hide stitches and improve wearability.
- Stitch focals first, then fill with seed beads using backstitch techniques.
- Match thread color and choose durable thread to avoid visible lines and abrasion.
- Control tension and reinforce paths for heavy beads to keep beadwork flat and secure.
Why bead embroidery is a game-changer for your textile art
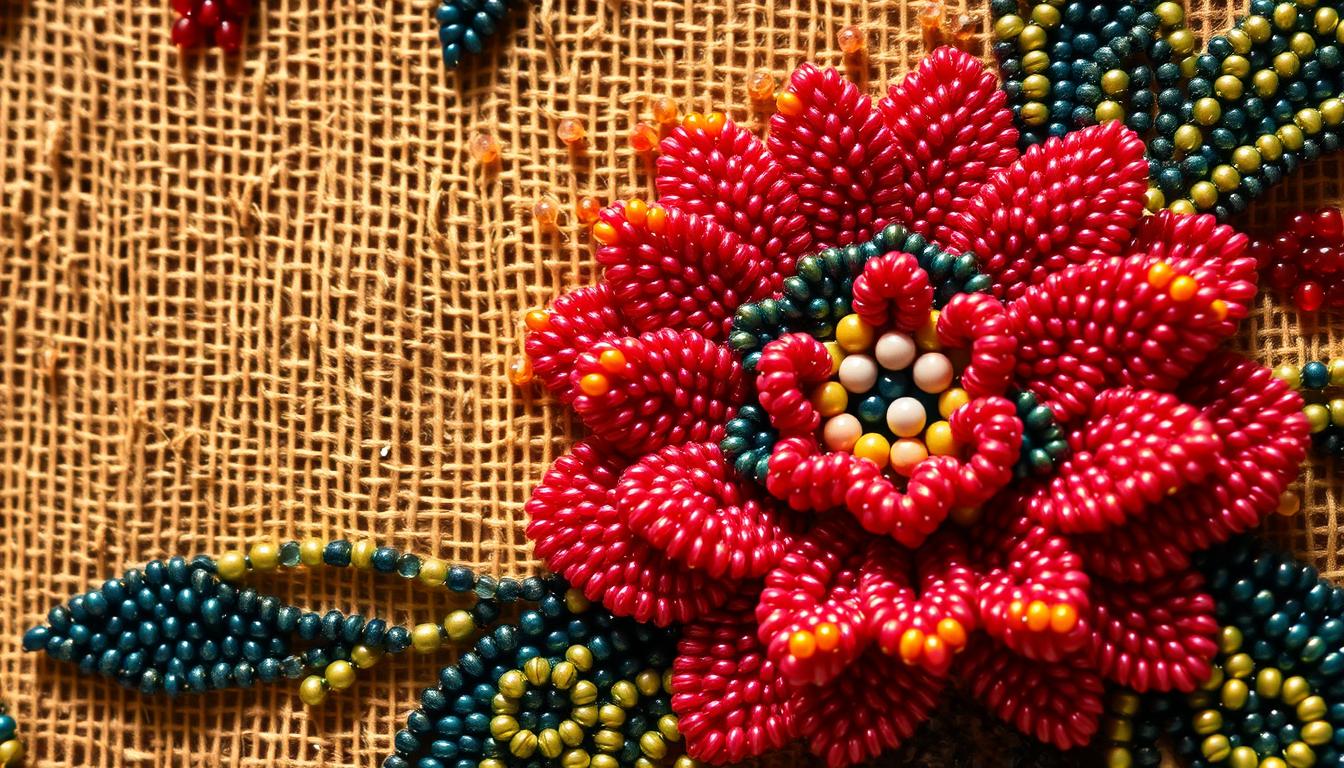
Bead embroidery turns flat pieces into something you can touch and wear. It adds sparkle, weight, and texture that thread can’t. This makes it perfect for items like pendants and cuffs where you want a strong center.
What bead embroidery adds that plain stitching doesn’t
Beads bring out highlights, shadows, and texture without changing the fabric. You can layer different beads to create shapes and draw attention. Use small beads to blend edges smoothly into the fabric.
Comparison with needlepoint vs embroidery, needlepoint, and cross stitch
Needlepoint and cross stitch build a fabric base from stitches. Bead embroidery, on the other hand, attaches beads directly to a flexible base. This lets you mix and match bead sizes and shapes for unique effects.
How bead embroidery expands creative needlework and thread art possibilities
Bead embroidery uses stitches like backstitch and couching in new ways. It lets you add materials like wooden die-cuts and buttons to create mixed media art.
It’s great for adding texture and light to your work. You can layer beads with thread for unique pieces. It’s perfect for both beginners and professionals, opening up new creative paths.
Essential supplies insiders use to get professional results
Get your toolkit right and your beadwork looks like it came from a studio. Start with sturdy foundations for bead embroidery that hold shape and stand up to heavy stitching. Stiffened felt such as GoodFelt, leather, suede, or denim will resist pilling, buckling, and fraying so you can stitch dense areas without distortion.

Choose a soft, neat finish for the back of wearable pieces. Ultrasuede backing gives a professional touch that feels good against skin and hides thread ends cleanly. For rigid structure in cuffs and pendants, add liners from cardboard (cereal boxes), milk-carton plastic, or brass blanks. Cut liners slightly smaller than the stitched layers so you avoid stitching through them.
Pick needles and threads that match your beads and project weight. Use beading needles in sizes 10–12 for seed beads. Strong threads like FireLine, WildFire, Nymo, or polyester reduce breakage. Double the thread in high-wear areas or when working with abrasive crystals and bugle beads to prevent fraying.
Match thread color to nearby beads, foundation, or backing to keep visible thread lines subtle. When thread blends, your bead colors stay the focus and stray stitches disappear. Carry a small spool of neutral and a spool matching your main bead color for quick swaps.
Save money without cutting quality by using cost-saving supply tips. Buy small sample packs to test colors and sizes before committing to bulk. Repurpose household items: old jewelry provides focal beads, thrifted fabric supplies scrap foundations, and cereal cardboard or milk-carton plastic make reliable liners.
Stock a few extras for smooth work: sharp scissors, a beading mat, beeswax to condition thread, fine marking pens, and craft glue for tack-down placement of liners. You can find most items from local bead shops and reputable online suppliers that carry GoodFelt, Ultrasuede backing, beading needles, and quality threads.
Using the right embroidery supplies, thoughtful foundations, and a color-aware thread strategy will lift your creative needlework. Small choices in materials and the habit of repurpose household items keep costs down while letting you produce pieces that look and wear like professional work.
Hidden techniques experts don’t advertise for flawless bead placement
Enhance your beadwork by mastering a few key needle techniques. These methods ensure steady focal pieces, straight lines, and the longevity of heavy or sharp beads. Practice these tips slowly until they become second nature.
Stop stitch and beaded backstitch for secure focal beads
Begin with a stop stitch to secure cabochons, ring focals, or large beads. This stitch anchors the focal bead while you add filler beads. Use the beaded backstitch for your main lines. Pick up small groups of beads, three for straight lines and two or fewer for tight curves.
Use backstitch sequencing to keep beads close. Come up through previous beads to lock the line and prevent gaps.
Holding beads in place and vertical needle entry for straight lines
Support beads with your non-dominant hand before pushing the needle through. This brief support prevents rolling and keeps rows even. Insert the needle vertically through the foundation for each bead to maintain consistent spacing.
Angled entries can distort line shape, so stick to vertical needle entry.
Reinforcing thread paths for heavy beads and abrasive crystals or bugles
For heavy beads, bugles, or crystals, reinforce thread paths to avoid breakage. Stitch the same path multiple times or double the thread with strong brands like FireLine or WildFire. Pass through critical beads more than once and weave the working thread under existing stitches when jumping across the back.
Additional practical tips for tension and curves
Keep even tension to avoid buckling the foundation or letting beads hang. For curves, reduce beads per stitch and tighten slightly to follow the shape. If a row goes awry, add a short reinforcement stitch through previous beads to realign the line.
| Challenge | Recommended stitch type | Needle techniques | Thread advice |
|---|---|---|---|
| Anchoring focal beads | Stop stitch | Hold bead in place, vertical needle entry | Single strong pass, tie off securely |
| Straight lines | Beaded backstitch | Pick up 3 beads per pass, come up through previous beads | Use polyester or nylon; reinforce as needed |
| Tight curves | Beaded backstitch with fewer beads | Use 1–2 beads per pass, shorten stitch length | Consider thinner thread for smoother curvature |
| Heavy or abrasive beads | Multiple passes along same path | Pass through beads more than once, weave under stitches on the back | FireLine or WildFire recommended; double thread if needed |
| Row misalignment | Reinforcement stitches | Stitch back through previous beads to realign | Keep tension even; avoid over-tightening |
Design process: how to turn a stash of beads into a polished piece
Clear a small workspace and spread out your beads. Start by picking a strong focal bead that will guide your choices. Look for cabochons, a ring focal, or artisan beads that catch light and fit the piece’s scale.
Arrange components without stitching to test placement and composition. Move your focal until it feels balanced. For pendants, brooches, and cuffs, try different orientations to see how they affect the piece.
Anchor the main element with a stop stitch first. Secure cabochons or a ring focal, then add seed beads and accent beads around it. This keeps the center stable while you refine the design.
Use blanks or liners for structured items like cuffs. They make shaping easier, ensuring your beadwork sits flat and maintains the curve. This is key for bracelets and cuffs where fit is important.
Cutting foundation shapes before stitching makes finishing easier. Trace the outline, cut with a margin for edging, then stitch into the shape. This avoids trimming through stitches later and speeds up edge finishing.
Stitching on full fabric is good for larger, flowing designs. Working on cut foundations gives cleaner edges. This comparison helps you choose the right workflow for your project.
Plan where to attach findings before finishing the back. Mark where jump rings, brooch bars, or bail loops need space. Glue liners in place before trimming to keep the piece aligned when adding edges.
| Step | When to Use | Benefits |
|---|---|---|
| Bead focal selection | First stage | Sets scale and color story for pendants brooches cuffs |
| Placement and composition trials | Before stitching | Prevents rework and reveals balance issues early |
| Stop stitch anchors | Initial stitching | Keeps cabochons and ring focal secure while you work |
| Cutting foundation shapes | Before or after design mock-up | Simplifies edge finishing and avoids cutting through stitches |
| Using blanks or liners | Structured pieces like cuffs | Maintains shape and improves wearability |
| Planned hardware placement | Before final edging | Prevents last-minute alterations and missing attachment points |
Mastering stitches and advanced textures for standout pieces
Think about how each stitch type changes your work’s look and feel. Simple changes in bead count or thread passes can make a big difference. They can turn a flat design into something you can wear or display.
Beaded backstitch modifications for curves and tight lines
For straight lines, use three beads per stitch to keep it even. For tight curves, use two or one bead per stitch. This makes beads fit snugly along bends.
Double your thread or pass back through previous beads for heavy elements. This prevents gaps and tidies the edge.
Couching, bezeling cabochons, and layered stitching for depth
Couching lets you lay down long bead strands or cup chains. Tack them down at regular intervals. This anchors heavy elements and creates crisp outlines without bulky thread showing.
For bezeling cabochons, start with an inner row using backstitch. Then add snug outer rows that hug the cabochon. Finish edges with brick stitch or a neat picot for a polished rim.
Layered stitching builds shadow and form. Place smaller beads on upper rows so layers stack without excessive bulk. Use doubled thread and reinforce paths where you add extra rows to keep the shape stable on garments or jewelry.
3D bead effects with bugle beads, cup beads, and upright drops
To create spikes or coral-like textures, stitch bugle beads upright. Secure the base with a small seed bead or by passing back through the bugle. Anchor cup beads and upright drops with size 15 seed beads so they sit raised above the surface and resist movement.
Reinforce these points with extra passes. Use interfacing or a sturdy foundation to hold the three-dimensional shape.
Mix these techniques to craft contrast and motion. Combine couching outlines with layered stitching fields. Add isolated upright drops for highlights. This mix proves decisive for a piece that looks like handcrafted art at a glance.
Preparing and finishing your work like a pro
Before finishing, plan how each layer will work together. Use stabilizing fabrics and interfacing to stop puckering and keep beads flat. For garments, use reliable embroidery hoops to keep fabric tight and avoid distortion when adding heavy beads.

Stabilize and hoop for steady stitching
Interfacing gives a solid base for your work. Choose the right weight for your fabric: light for silk, medium for cotton, and heavy for denim or leather. Ultrasuede backing is great for wearables as it hides stitches and resists wear.
Plan your lining and trimming
Add a lining to keep the piece’s shape. Cut it a bit smaller than the front so you don’t stitch through it. Use a little PVA or fabric glue to hold the lining in place while you stitch the back.
Trim, cut, and match the backing
When cutting the backing, use the front and lining as a template. This ensures the backing fits right. Trim carefully and make sure the Ultrasuede backing covers all raw threads for comfort.
Edge finishing and attaching hardware
Choose your edge finish before stitching the perimeter. Options like whipstitch, beaded picot, or folded facings protect the edges and look good. Place findings like jumprings or brooch bars during the sandwiching stage to avoid reworking later.
Secure attachments and reinforce points
Use strong thread to attach findings. Pass through each anchor point several times. Reinforce with beads or couching stitches where the hardware bears weight. This makes your piece durable and prevents pull-through.
Finishing touches for comfort and longevity
Cover the back with Ultrasuede for comfort and a neat look. Finish raw edges and trim excess backing close to stitches. A light glue on the seam allowance keeps layers from fraying without stiffening the piece.
| Task | Recommended Material | Why it matters |
|---|---|---|
| Base support | Interfacing (light/medium/heavy) | Prevents puckering and holds bead weight |
| Hooping | Magnetic or standard embroidery hoop | Keeps fabric taut for even stitches and fewer distortions |
| Lining | Cardboard, plastic, or fabric | Preserves shape; cut slightly smaller to avoid stitch-through |
| Back cover | Ultrasuede backing or leather | Hides stitches and improves bead backing comfort |
| Edge finish | Whipstitch, beaded picot, folded facing | Protects raw edge and complements design |
| Hardware | Jump rings, brooch bars, strong thread | Attach during finishing; reinforce anchor points |
| Temporary hold | Fabric glue or PVA | Use for gluing tips: hold lining in place before final stitching |
Conclusion
Bead embroidery mixes traditional stitching with beadwork, opening up new creative paths. Start with strong bases like stiffened felt, leather, or denim. Back them with Ultrasuede for a solid foundation for both wearables and decorations.
Secure focal beads with stop stitch and beaded backstitch. Choose needle sizes between 10–12. Reinforce threads for beads that are heavy or rough to ensure durability.
Designing begins with a focal point and careful placement. Pick cabochons or artisan beads first. Try different compositions for pendants, brooches, and cuffs. Cut foundations before stitching when you can.
Use interfacing and quality hoops to stabilize garments and avoid puckering. Finish edges well, considering findings and liners for a professional look.
Insider techniques like vertical needle entry and reinforced thread paths can elevate your work. Bead placement is key to moving beyond simple needlepoint and cross stitch. Beadwork adds depth and dimension, transforming thread art into expressive textile art.
For your next steps, practice core stitches and use resources like Interweave guides and YouTube tutorials. Building a small, quality supply kit will help you achieve polished results.
In conclusion, start with the right materials, follow secure stitching methods, and design with balance. Over time, these habits will help you turn a stash of beads into standout mixed-media pieces for both craft shows and everyday wear.