Could a single needle and a spool of thread change how you relax, create, and connect with others?
This beginner embroidery guide shows you how to start, whether with hand or machine embroidery. You’ll learn what supplies to get, how to set up your space, and the essential stitches for designs.
Hand embroidery adds a unique, textured feel with stitches like backstitch and French knots. Machine embroidery, on the other hand, makes complex patterns faster. Brands like SINGER and Husqvarna offer machines for beginners and experts alike.
Start with the basics: tools, workspace, and basic stitches. Then, master thread and needle skills, learn knot-free starts and finishes, and try simple projects. By the end, you’ll know how to embroider and how to keep improving.
Key Takeaways
- Embroidery is accessible—just fabric, thread, and a needle can get you started.
- This guide covers supplies, workspace setup, basic stitches, and machine vs. hand embroidery.
- Handwork offers a personal touch; machines offer speed and precision from brands like SINGER and Husqvarna.
- Follow sections in order to build skills: setup, stitches, thread techniques, and finishing.
- Practice simple projects and transfer methods to grow confidence quickly.
Essential embroidery supplies and tools for beginners
Before starting, collect some reliable embroidery supplies. This list covers the basics you need to begin confidently. Choose items that are compact and of high quality to avoid frustration.
Must-have tools: hoops, needles, scissors
Get a two-part hoop with an inner and outer ring and a screw closure. Sizes from 4 to 12 inches are good for most projects. Plastic hoops are gentle on fabric, while wood hoops look great for display.
Choose embroidery needles with a larger eye for stranded thread. Needles come in various sizes and lengths. Match the eye size to your thread count and replace dull needles as needed. Always have extra needles in your kit.
Use small, sharp embroidery scissors for precise cuts. Pointed tips help trim threads close to the fabric without damaging stitches. Comfortable handles reduce hand strain during long sessions.
Choosing fabric and thread
Start with forgiving fabrics like cotton muslin, quilting cotton, linen, canvas, or osnaburg. Looser weaves such as muslin are easier to pierce and guide for beginners. Avoid fabrics that are too fragile or have a very tight weave.
Standard 6-strand embroidery floss is versatile. Many prefer DMC floss for consistent color and smooth strands. Use two to three strands for most beginner projects. Cut floss to 18–24 inches to avoid tangles and weak spots.
Optional tools and helpful extras
Marking tools speed up layout and transfers. Water-soluble markers and fabric pencils let you trace and erase designs cleanly. Iron-on transfer paper and Sulky Stick’n Stitch offer printed transfer options for more precision.
If you explore machine embroidery, keep several stabilizers on hand. Tear-away, cut-away, and water-soluble stabilizers each serve different fabrics and designs. A stabilizer sampler pack helps you test what works best for your machine.
Extra helpers improve workflow: a needle threader, hoops with clips, floss organizers, pre-printed embroidery kits, and a light table or bright window for tracing. Online stitch libraries and communities provide fast answers when you run into a stitch you haven’t practiced yet.
Preparing your workspace and hooping fabric
Before you start stitching, make your workspace calm and well-lit. Use a bright lamp or sit by a window for good light. Choose a chair that supports your back and a table at elbow height.
Keep scissors, needles, and thread in small containers nearby. This way, you won’t waste time searching and can focus on your embroidery.
Setting up a comfortable stitch area
Arrange your tools so your hands move easily. Use a small tray for needles and a pincushion to stay organized. If you work on small details, a magnifier or task lamp can help.
Make your workspace a routine area. This helps keep your posture right during long sessions.
How to fit fabric into an embroidery hoop
Cut your fabric square a bit larger than your hoop. Loosen the screw and separate the hoops. Place the fabric over the inner hoop and press the outer hoop down evenly.
Tighten the screw a little, then pull the fabric tight around the edges. Finish by tightening the screw fully but don’t overdo it to avoid hand strain.
Check the fabric’s tension by tapping it. It should sound like a drum with a bit of give. Don’t stretch the fabric too much for detailed designs. Recenter your design before the final tighten to keep motifs aligned.
Using stabilizers and hooping for machine embroidery
Choose the right stabilizer for your fabric: tear-away for stable cloth, cut-away for knits, and water-soluble for openwork. Hoop the fabric and stabilizer together to avoid puckering and keep stitches smooth.
For machine embroidery, make sure the hoop fits your machine and follow the brand’s guidelines for stabilizer placement.
Start with small designs and a simple hoop to build confidence. Many machine brands, like Brother and Janome, offer tutorials on hooping for machine embroidery and aligning multi-hoop designs.
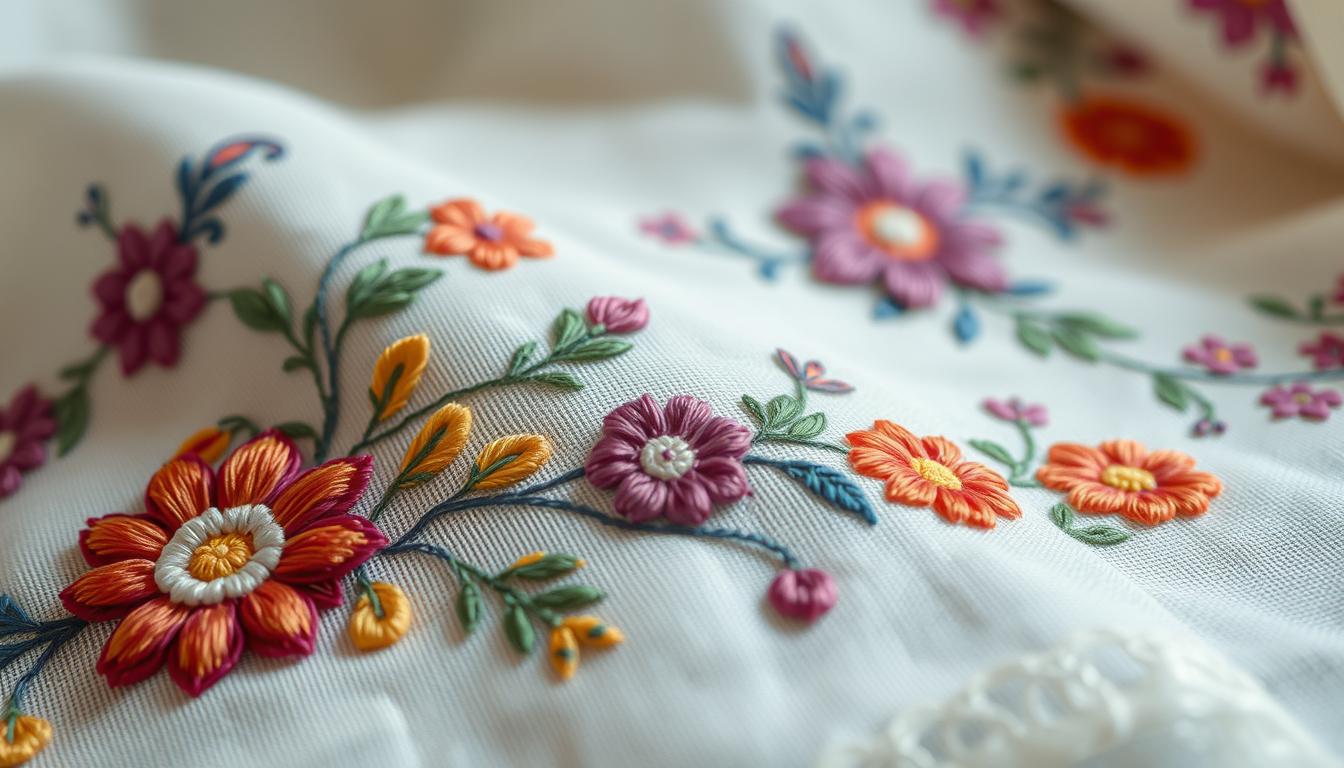
Basic stitches every beginner should learn
Start with a few simple stitches to quickly learn embroidery basics. These stitches are key for small designs, text, and fills. Try each stitch on scrap fabric and change thread counts to see texture changes.
Running stitch and its uses
The running stitch is the simplest stitch. It’s great for airy designs, quick outlines, and simple frames. You can do short stitches for speed or single, even stitches for neatness.
Backstitch and text/outlines
Backstitch makes crisp lines perfect for text and outlines. Bring the needle up and down one stitch length behind. This keeps the front smooth. Use the hole at the end of each stitch to keep the back tidy and save floss.
Split stitch and stem stitch for texture and vines
Split stitch creates a braided effect by going through the center of the previous stitch. Keep stitches short for good texture.
The stem stitch looks like rope because stitches overlap. Start each stitch from the same side of the last for a consistent look. It’s great for vines, branches, and flowing outlines.
Satin stitch, straight stitch, and seed stitch for fills
Satin stitch fills solid shapes and letters. Outline first for a clean edge, then fill in with close stitches. Avoid carrying thread across the back by bringing the needle up near your last exit point.
Straight stitches are versatile for shading and texture. Seed stitch uses tiny, random stitches for soft fills and speckled texture, like flower centers.
French knots and embellishing details
French knots add small, raised dots that catch light. Wrap the floss around the needle one to three times to change size. Hold the thread taut while pushing the needle back through near the starting point. Secure the back when knots are sparse to prevent loose tails.
Practice these basic stitches in short sessions. Use drawn lines to guide even stem or split stitches. Test different thread counts to see how each stitch responds. These easy steps make learning embroidery a satisfying journey.
Threading, separating floss, and needle techniques
Getting clean, even stitches starts with how you handle your thread and needle. Use small, steady steps when separating floss and threading needle to avoid knots and snags. Pick one approach at a time and test it on scrap fabric while learning embroidery.

Separating strands and selecting strand counts
Standard embroidery floss has six strands. To separate strands, tap the cut end to loosen fibers, pinch the tip, then pull one strand out slowly. Pulling multiple strands at once invites tangles. Run your hand down reassembled strands to smooth and re-twist them before stitching.
For most beginner projects choose 2–3 strands. Two strands give a finer line for simple stitches. Three strands add more body and color saturation. If you ever use all six strands, switch to a needle with a larger eye to match the strand counts.
Threading the needle and needle threader tips
Cut thread to 18–24 inches (46–61 cm). Shorter lengths knot less and stay strong. For threading needle try the pinch method: cleanly cut the floss end, pinch to reveal the tips, then press into the needle eye.
Use a wire needle threader if the needle eye is small. Push the wire loop through the eye, pull floss through the loop, then pull the loop back through. Wetting the cut end slightly can flatten fibers and help them slip through tiny eyes.
Stabbing method vs sewing method
The stabbing method moves the needle fully down through the fabric, then returns up at the exit point. This two-motion technique gives precise placement and control for detailed work. It pairs well with stitches that need exact spacing.
The sewing method passes the needle through in one fluid motion, bringing it back along the same path when needed. This approach speeds up repetitive lines and suits decorative runs. Try both methods to see which needle techniques match your rhythm and the stitch you are making.
Starting, changing, and finishing threads without knots
Starting a project right makes it look professional. For beginners, an away knot or a knot-free anchor works well. The away knot is great for new stitchers, as it’s secure and reliable.
Starting with an away knot
Begin by tying a small knot in your floss. Then, insert the needle about 4 inches from your design. Stitch towards the design as usual.
When you’re done with that strand, pass the needle through several stitches three times. This secures the tail. Trim the excess knot close to the fabric. Then, weave the short tail through backing stitches three times for a neat finish.
Alternative starts without knots
For nearby stitches, start by weaving new thread through existing stitches three times. This method anchors the thread without a visible knot. It’s perfect for delicate linens and visible projects like tea towels.
Changing floss mid-project
Stop when about four inches of floss remain. Weave the leftover through several stitches three times. Then, trim close to the fabric.
To start the new strand, weave it through nearby stitches three times. Continue stitching. Plan your path to avoid long jumps, saving thread and preventing bulk.
Weave in ends tips
If a thread is too short, use the needle eye to pull it through stitches. Always go through the backs to hide tails. For extra security, change weave direction every pass. This adds grip without visible knots.
Finishing embroidery in hoop
To finish a piece in a hoop, re-center the design and pull the fabric tight. Tighten the hoop screw. Trim excess fabric, leaving about a one-inch edge around the inner hoop.
Securing the hoop edge
Use a long length of floss to whipstitch or running-stitch around the raw edge. Leave a tail. Pull the running stitch tight to gather the fabric into the back of the hoop.
Tie a small knot with the tail, trim the excess thread, and press the front lightly from the back if needed.
For visible items like scarves, avoid bulky knots and aim for tidy backs. Planning stitch order and using knot-free starts, careful changing floss, and clean weave in ends keeps your work crisp. These small habits improve your starter embroidery and save time fixing the back later.
Embroidery project ideas and pattern transfer methods
Start with small projects to build your skills and confidence. Choose beginner projects with simple motifs. Try small hoops with single florals, monograms, patches, or handkerchiefs to practice stitches and finish quickly.

Choose projects that you can use in real life. Embroidered wearables like monogram shirts and hats make great gifts. Home décor items such as pillowcases, napkins, and small wall hangings add practice to your daily life. For machine users, try small designs for shirts or hat monograms to improve your speed and tension.
Simple beginner projects to practice stitches
Work on samplers with limited colors and stitches. A 4–6 inch hoop with a single flower or animal outline helps you practice backstitch, satin stitch, and French knots. Make napkins or patches that use only three stitches to master rhythm and spacing.
Pattern selection and designing your own
Choose patterns with open spacing and clear lines. Map a mental stitch path before starting to avoid long jumps. When designing embroidery, sketch motifs on scrap paper, test stitch choices on fabric, and decide on strand counts and colors first.
Pattern transfer methods
Tracing works well for lightweight fabrics. Place the pattern under the fabric and trace with a pencil or water-erasable marker using a window or light box. Iron-on transfers offer speed for cotton linens; warm fabric, avoid steam, press the transfer face down in short sections and check often to prevent shifting.
Pre-printed fabric and kits from reputable providers come with floss and instructions. They remove guesswork for beginners and speed learning for DIY embroidery projects. Sulky Stick’n Stitch is a printable stabilizer you stick to fabric, stitch through, then soak away to reveal fine detail.
Traditional tools like carbon paper and transfer pens work for darker or textured fabrics. For machine designs, match hoop size and stabilizer to the pattern and run practice stitches to fine-tune settings.
| Project Type | Best For | Key Stitches | Transfer Method |
|---|---|---|---|
| Small hoop sampler | Practice and display | Backstitch, satin stitch, French knots | Tracing or pre-printed fabric |
| Monogrammed shirt or hat | Wearables and gifts | Split stitch, satin stitch | Iron-on transfer or machine file |
| Patches and badges | Accessories and repairs | Satin stitch, straight stitch | Sulky Stick’n Stitch or tracing |
| Napkins and table linens | Home décor | Running stitch, backstitch, simple fills | Iron-on transfer or tracing |
| Pre-printed kit | Beginners wanting guidance | Varies by kit; guided | Pre-printed on fabric |
Test stitch paths on scrap fabric before transferring a final pattern. Use online stitch libraries and downloadable samplers to expand your repertoire. Keep projects small at first, then scale complexity as your confidence grows in designing embroidery and executing clean pattern transfer.
Conclusion
This embroidery guide has shown you a simple path. First, get the basics like a hoop, needles, scissors, floss, fabric, and marking tools. Then, set up a comfy workspace and hoop your fabric right.
Start by learning key stitches. These include the running stitch, backstitch, split/stem stitch, satin and straight/seed fills, and French knots. Practice a bit each day to get better.
When starting, use 18–24 inch floss lengths and 2–3 strand counts for most beginner projects. Learn how to separate and thread floss without knots. Also, practice neat end weaving and knot-free starts and finishes.
Begin with simple projects that let you practice easy stitches. This will help your hand and eye work together better.
As you get better, use kits, online stitch libraries, and tutorials from SINGER or HUSQVARNA. Look for embroidery kits, join Instagram communities, and find local stitch groups. Also, check out platforms like CREATIVATE™ for patterns and inspiration.
Remember, getting better takes practice and fun. Make sure your workspace is comfy and your stitches are clean. Start small and finish your projects in hoops or frames. This will help you see how far you’ve come and keep you inspired.